Step 3: Helping a Tiny Switch — Transistor or MOSFET
In the previous step, we added a switch to easily turn our LED on and off. But what if we want to power something bigger — multiple LEDs, an LED strip, or other components? Our small switch can’t handle that much current. In this step, we’ll see how to use a transistor or a MOSFET to take the load off the switch.
Why Does a Switch Need Help?
Small switches (like tiny tactile push buttons) are often rated for very low current — sometimes only 20–50 mA. Meanwhile, an LED strip might need 300 mA or more. If all that current goes through the switch, it can overheat, wear out quickly, or even fail.
The solution? Let the switch handle only a small control current, while a transistor or MOSFET does the heavy lifting.
Using a Transistor as a Helper
Let’s take a common BC337 NPN transistor. It works like a gatekeeper: a small current into the base lets a much larger current flow from collector to emitter.
Key Parameters to Check in the Datasheet:
- Max Collector Current (IC) – how much current it can safely switch.
- hFE (current gain) – how much the base current is multiplied to the collector current.
- VCE(sat) – the voltage drop when the transistor is fully on (around 0.3 V).
- Power Dissipation – how much heat it can safely handle.
Good practice: Always design for the lowest hFE value listed in the datasheet. That way, even if you replace the transistor with a weaker one, your circuit will still work reliably.
Small Experiment:
If you don’t add a “pull-down” resistor on the base, the transistor can act strangely. The LED might glow faintly even when the switch is off, or it may react to you touching the wire. That’s because the base is floating and picking up noise. Adding a resistor (e.g. 10 kΩ) from the base to ground fixes this — it keeps the transistor fully off when the switch is open.
Why a MOSFET Can Be Better
A transistor works fine, but it has a drawback: it always drops some voltage (around 0.3 V). At low supply voltages like 3 V from two AA batteries, that’s about 10% lost.
A better choice is a logic-level MOSFET, such as the BS170. A MOSFET is controlled by voltage (not current like a transistor), and when fully on, its resistance is very low. That means the voltage drop is tiny — often just a few millivolts.
Important MOSFET Datasheet Specs:
- RDS(on) – resistance when on, determines how much energy is lost.
- VGS(th) – gate threshold voltage, logic-level means it works at low voltages (~2 V).
- Max Drain Current (ID) – the maximum current it can safely pass.
- Package and Thermal Limits – how much heat it can handle.
As a result, an LED circuit with a MOSFET shines brighter, runs cooler, and wastes less power.
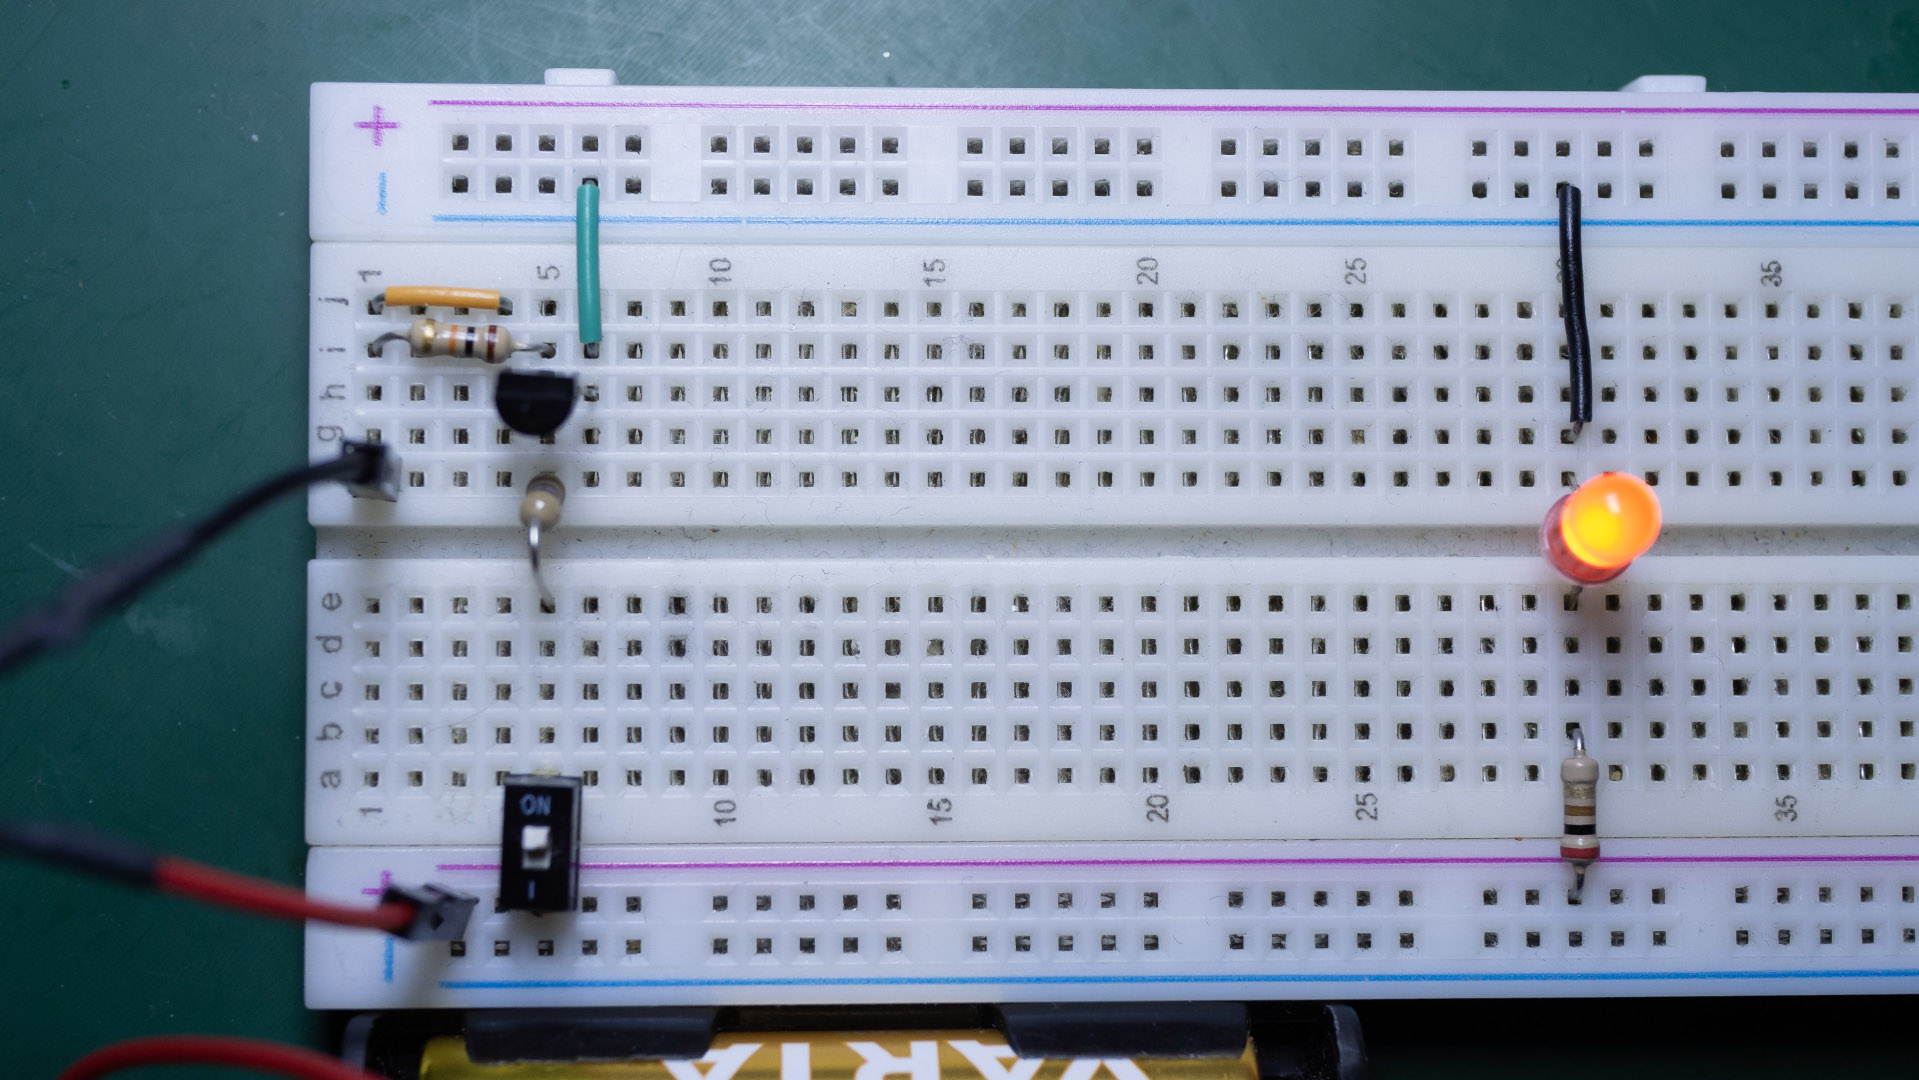
Building the Circuit
Parts needed:
- Breadboard
- 2 × AA batteries (≈ 3 V) with holder
- 1 × LED
- 220 Ω resistor (LED current limiting)
- 1 kΩ resistor (for base/gate)
- 10 kΩ resistor (pull-down)
- 1 × SPST ON–OFF switch
- 1 × BC337 transistor or 1 × BS170 MOSFET
- Jumper wires
Steps:
-
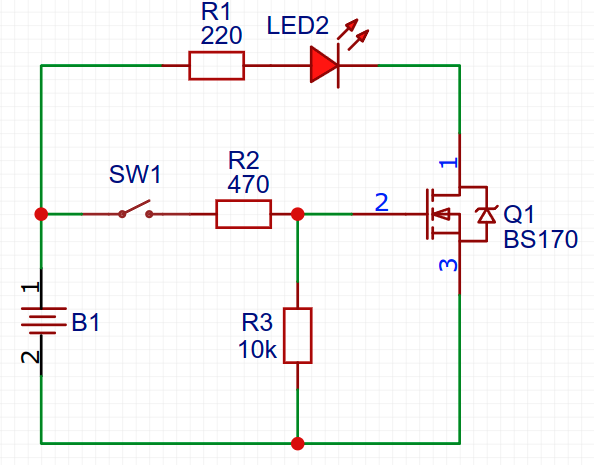
- Connect the switch through a 460Ω resistor to the transistor’s base (or MOSFET’s gate).
- Place the LED with its 220 Ω resistor on the collector (transistor) or drain (MOSFET).
- Connect the emitter (transistor) or source (MOSFET) to ground.
- Add a 10 kΩ pull-down resistor from base/gate to ground.
- Press the switch: the LED lights, but the main current flows through the transistor/MOSFET, not the switch.
-
Recap
- A small switch can’t safely handle large currents by itself.
- A transistor (e.g. BC337) can help, but it always loses some voltage.
- A logic-level MOSFET (e.g. BS170) is more efficient, especially at low voltages.
- Always check datasheets: current ratings, hFE or RDS(on), threshold voltage, and thermal limits.
What’s Next?
In the next step, we’ll add a capacitor and discover a neat effect: instead of turning off instantly, the LED will slowly fade out when power is cut. This simple trick has many practical uses.